

For those that are looking to campervan in New Zealand, here’s a shortish run down of things to look out for when hiring a vehicle and our itinerary for 4 weeks around both the North and South islands. We felt we were a bit pushed for time, however, we did lose a couple of days from 2 breakdowns and we had to stall a day as our Franz Joseph Glacier trip was put back one day because of the weather. This is not to say it would happen to you, it is still something that needs to be kept in mind when planning!
What type of camper do I need? 2wd, 4wd
Unlike Australia campervanning (particularly the West coast) you don’t really need a 4×4 camper in NZ. Unless there is somewhere you really want to go off-roading (e.g. some campsites up in Coromandel are on long stretches of gravel road which isn’t normally covered by normal campervan insurance, more on this later) we didn’t find a need for a 4WD.
Self-contained (toilet/shower combo)?

Self contained certification sticker
Another consideration is whether to get a self contained vehicle (NZS 5465 certification - https://www.nzmca.org.nz/self-containment/). These allow the hirer to use campsites in areas in which it is deemed would be destructive for the environment to have full blown facilities of a campsite. We opted for without and didn’t feel put out, there are more than enough normal campsites around to suit, but if you want to get to some more limited, or convenient (i.e. in a town) spots then you’ll more likely be looking for a self contained option, but as I say, most of the tourist stops have more than enough campsites to suit. If self-contained, the camper should have a blue sticker as below, this allows the wardens to know at a glance that you are allowed to be there:
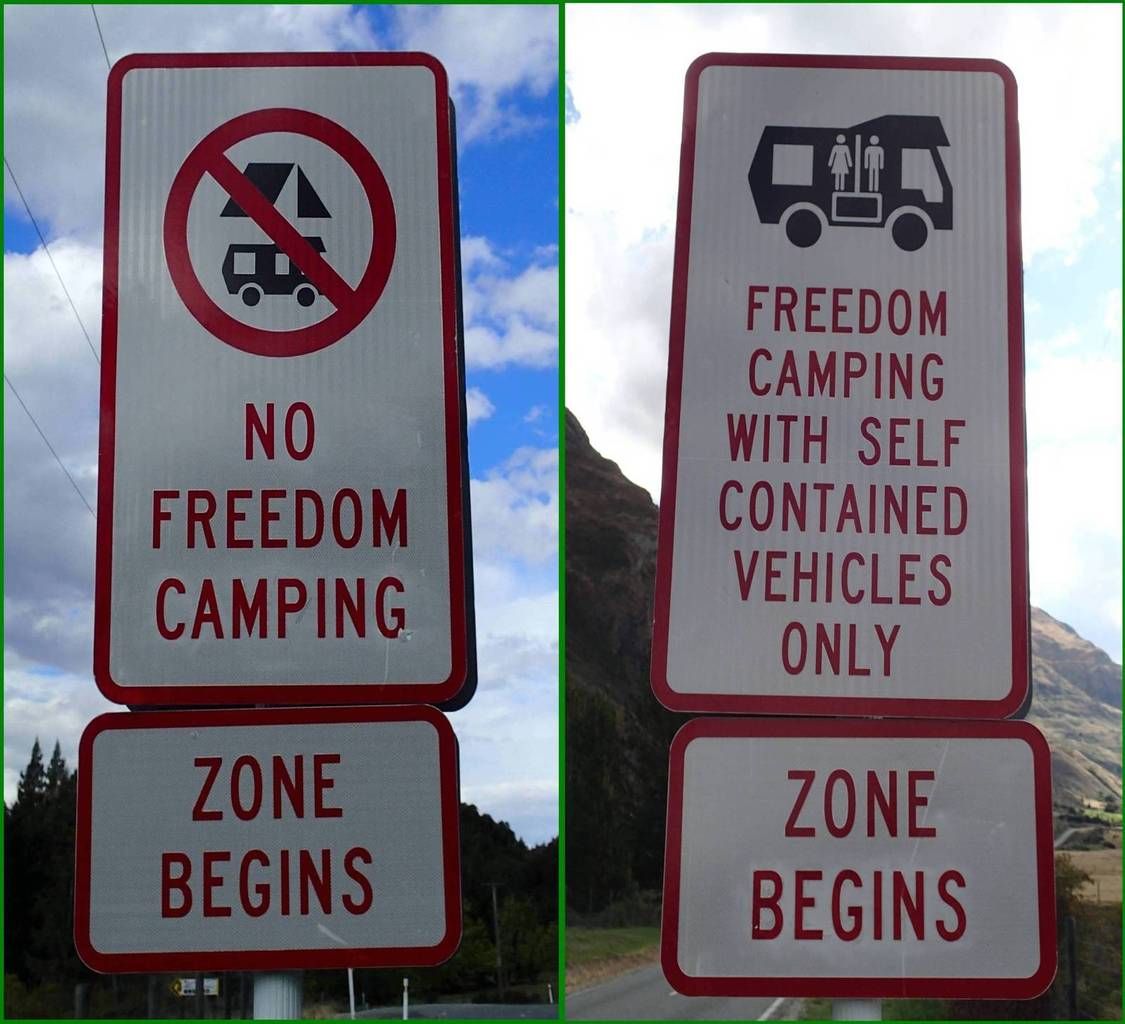
Freedom Camping
Freedom camping basically allows a hirer of a self-contained camper to camp at one of the allocated sites (and signposted, yes they are very strict when enforcing this) you find in the apps (Rankers has a pretty good run down of these campsites). Although we didn’t stay in these campsites as we weren’t self contained, they are basically a variety of campsites which have minimal facilities, if any (sometimes they are just a carpark). These campsites generally have strict rules regarding the length of stay. These types of camping spot are generally free or donation.
All this said we did spot a poster in an Information centre with the following info regarding DOC campsites (as there are quite a few rules, but this is simple!)
 |
 |
Size of camper?
Obviously this is up to how much you can put up with being in someone else’s back pocket for a long period of time. It’s sort of the same feeling when buying a tent, the tent labels say the tent is good for 3 people but in fact its only just good enough for 2 and luggage. Things to checkout when looking at sizes; number of beds (quite obvious), where those beds are located (some are inside, and some are a tent perched on top), with campers which have an additional bed up top, check the expected ceiling height, some are only suitable for children! Also check for storage space, this may sound obvious but quite a few of the cheaper campers don’t actually have much space for, you, your bags, clothes and food storage. If you are going to be taking big bulky non-collapsible suitcases with you, where do you put them while on the road?
Choosing campsites and maps
While there are quite a few campsites to choose from, you have to be aware of restrictions for certain vehicles. The main one is whether the vehicle is rated as self contained or not (should state on the camper booking website, look for the NZS 5465 certification – https://www.nzmca.org.nz/self-containment/). This mainly restricts where you can go in terms of Freedom Camping (see above).
There are a vast amount of camper sites across NZ, and like many things, there’s an app. While there are a good selection of apps around there are 3 main ones for NZ:
- WikiCamps NZ – Android (free) / iOS ($2.99)
- Rankers – Android (free) / iOS (free)
- CamperMate – Android (free) / iOS (free)
While there are probably a few other apps around, these are the few we had at hand (including a camper book that came with the camper, worth noting, for those times you could ran out of battery!). In regards to which is best, none covered all campsites so we were flicking between them all to compare at some points. In regards to which one we’d use most, it would have to be WikiCamps. It’s the most user friendly, usually has the most info and it’s easy to use with OFFLINE maps! The others were unreliable in offline mode (CamperMate just failing to load large areas, and Rankers showing a jumble of camp site balloons!). Each have their merits though, Rankers is the official app and shows the absolute information for campsites (e.g. self contained, maximum number of nights, available facilities, cost and contact details) and so this was a good baseline for information when compared to WikiCamps in which it’s down to users to put the correct information which can sometimes be misleading and just downright wrong. CamperMate was in the middle of the two, and provided quite a few extra campsites that weren’t available on either. If I had to pick one though, it’d have to be WikiCamps, but I’d have all 3 to compare when I’m on the road (remember to download the relevant maps before hand!).
DOC
Another VERY useful tool to have is the North and South Island DOC (Department of Conservation) leaflets. These have a great list of campsites (most of which are in the apps, but not all) which are usually cheap (6 NZD/pp/pn) to stay in with limited facilities (listed in the leaflet). Available from most tourist offices and in PDF (http://www.doc.govt.nz/parks-and-recreation/things-to-do/camping/conservation-campsites-brochure/). Worth noting that some, but very few DOC campsites require booking. Also, some of the campsites listed in the leaflets and PDF’s aren’t solely DOC and are commercial (read more expensive).
DOC campsites also have a voucher system, this makes it super easy to stay at DOC campsites. Basically the vouchers are pre-dated per week and instead of paying per campsite, you have a voucher which entitles you to stay there for a week per voucher. Ask your camper van company when you get the vehicle for these. We don’t have info on prices as we got them free…
One last good resource to have is the incredibly useful MAPS.me ( https://maps.me/get ) app, free on all platforms. It’s an offline map that’s searchable, taggable etc. It’s the only thing you need around NZ in terms of a GPS as the roads are fairly easy to navigate. Just remember to download the NZ maps before heading off!
![]() Length of time to visit
Length of time to visit
This all depends on what you want to see and do, how lazy you want to take it! We rarely stayed at the same campsite for more than a night but it didn’t feel strange, once you’ve unpacked in your camper you are done! We looked at quite a few blogs for ideas of time and most said between 3 and 4 weeks, luckily we had been in a camper in Oz for the past 3 weeks so we kind of knew what to expect and that this would probably be enough for us. Bear in mind trips like the Glacier trips get cancelled and you may have to wait around for a day or two to rebook, it’s a pain, but it happens (apparently up to 50% of trips are cancelled). Get a map, paper or on Google maps, draw on it the places you want to visit, work out travel times and a couple of rest days, plus a couple of trip delay days and go with that. There are always going to be places and sights which you do faster or hear aren’t worth going to and so you gain a day or half a day. It’s different for every trip.
Things to note/consider when choosing a camper:
These are some points to consider when choosing a camper. Every camper company presents this differently and prices of vehicles change with the seasons so get yourself a spreadsheet, a phone (probably Skype) and chat to them!
- Diesel mileage costs – NZ has a TAX (Road User Charges (diesel tax) of NZ$6.00 per 100kms), this generally doesn’t make a difference overall as the cost of diesel is lower than petrol so it balances itself out.
- Water container filling – Do you plug a hose into the side of the camper or do you have to lug a water container to the tap? Also, where does this container stay? Does it take up valuable storage space?!
- Unlimited mileage – Check that the hire comes with unlimited mileage! It maybe included in the topend insurance. It can be as high as 20 cent per km…
- Insurance coverage for gravel roads – This is a big one, how far are you covered to drive on gravel roads? Most camper companies limit the amount of driving you can do off sealed roads. This means if you break down on an unsealed road your insurance will most likely be invalid and you’ll have to fork the bill. The catch comes when you realise most campsites have some kind of unsealed road to drive on to get to them (especially the DOC campsites). Ours came with 100m which was nowhere near enough (so we risked it sometimes) but it’s just something to keep in mind when deciding whether to visit that lovely campsite 20km down a gravel track. If you break down, it might be a long push…
- Age of the vehicles - Pretty obviously, older vehicles are usually cheaper but probably don’t look as nice, have older furnishings, do fewer km to the gallon and are more prone to breakdown. If you get the chance, have a look before you sign and with a bit of luck they’ll have a newer one available if you really don’t like it.
- Fuel consumption – How long does the camper run on a gallon of fuel? Only really relevant if you are hiring for more than a month (with a few calculations, we found that the cost of hire offsets this)
- Electric – How many batteries does the camper have? How to they charge? As we only had one battery in our camper, the electric sockets were only available if we were plugged directly into mains (lights and water pump ran off the battery), newer campers may be different and you may be able to use the power sockets while running off a secondary battery.
- Fridge – Does it have one? What’s the size? Does it have a freezer? See note on electric, once our battery ran out, so did the power to our fridge (so any freezer section would be useless)
- Water tank size - how often will you have to fill up?
- Toilet – Does it have one?
- Insurance – see below! Check for windscreen and tyre coverage!
- Extras included (don’t bother with table and chairs!) – What is included? Bedding? Towels? In Oz and NZ we got free table and chairs because we bought the added insurance we regretted it each time! It just takes up space and we didn’t really use it! It’s a pain to put up and if you are only staying one night it’s rarely used! (It’s probably a good addition if you plan on staying in the same sites for multiple nights – it’d save putting the inside table up!)
- Extra drivers costs – How many people can drive? Is there an added cost for more than one driver? This is sometimes included in the more expensive insurance policies.
- Hot/cold water – Is the water heated or always cold?
- Hand pump for water – Do you manually pump the water into the sink, or is it electric? We found an electric one better, but it does sap stored electricity!
- Vehicle design… – Wicked campers are known for their pretty outlandish designs on their campers, and are mostly quite unsavoury/offensive. Apparently you can’t request a design and it’s allocated based on what they have at your chosen pick up point. So if you are going for one of theirs – prepare for anything. Yes, we’ve seen some pretty bad ones, the ones on the website are 10/10 compared to what you can get.
- GPS? Everyone has a phone… (See maps.me) – Don’t let them sell this to you! Use your phone (get a usb car charger for longer journeys) and use MAPS.me (see above)!
- Layout – Personal preference, if you can go see one before though it’s probably better!
- Kitchen stuffs – most come with, but some are extra in insurance, some are an additional charge, check
- One way fees – This is explained more below but worth being cheeky to see if you can get it waivered!
- Age limits – Who can drive the camper? It’s usually above 21
- Camper company campsite membership – Worth checking if the camper hire companies are members of any campsite groups such as TopTourist or Big4, if you are planning to go to a few of these it may save 10% per night. But don’t stay at these sites too much your not doing campervanning properly, get out to some fields!.
Insurance
All camper companies love insurance! You don’t want a crash, neither do they, but they’ll make you pay through the nose for the security. We took the full insurance each time as we didn’t really know what to expect, but in NZ, it’s like driving in the UK, pretty easy going (Oz is a different story, check out this page for info related to campervanning in Oz). This said, you do get some extras for getting the more expensive packages, along with the security of knowing you are nearly fully covered. I say nearly as you’ll still have to check what isn’t covered, sometimes windscreen and tyre damage isn’t covered (go figure), but some of the premium packages do cover this. We had an incident on our last day on our Oz travels which our windscreen was cracked by a stone (half an hour before dropping the van off!), and I don’t think this is out of the ordinary considering how many miles we’d done and the amount of land trains we’d passed, we phoned the company straight away as per the terms of our insurance and luckily we were covered.
Remember, it can happen to you! If you have the cash, get it!
You’ll sometimes get extras chucked in if you get the premium packages which helps, along with free extra drivers, table and chairs, and vouchers for a few things. We got some DOC passes for our trip!
One way fees
If you aren’t starting and ending your trip at the same location, you’ll probably have an added one way fee. This can be as high as 500NZD. There’s not much you can do about this apart from maybe adjusting your schedule if possible and looking at taking alternative flights. Sometimes the fee is waivered for long term hire and also if you are travelling in the right direction (see “Travel in the right direction” below)….
Cooking
Cooking in a camper is much like cooking when camping, sometimes a pain in the a***! Food prep can be a hassle if you are short of worktop space. Plan meals, and buy ingredients that you can store in hot and cold, this usually means a few tins, pasta, and a few things in the fridge (as this runs of the stored electricity you won’t want to keep opening and closing it!). How many hobs do you have in the camper? Is this enough? We bought an cheap extra camping stove so we could cook properly.
Which company?
There are TONS of companies to choose from. Most are aimed at particular clientele which may tell you something about the state of the vehicle. We had a camper from LuckyRentals which was the cheapest thing going (they are refurbished ex Jucy vans), we would NOT recommend them as we broke down twice, and they weren’t great at dealing with it – but then again, it was cheap…! Here’s a list of well known camper van hire companies, use common sense and read some reviews, you’ll get a feel for the company soon enough.
Here’s a list of camper companies we looked at, including a whole lot more found from everyones friend, Google.
- www.discovery-motorhomes.co.nz – used these guys in Oz, great service
- www.hippiecamper.com
- www.jucy.co.nz
- www.travellers-autobarn.co.nz
- www.spaceshipsrentals.co.nz
- www.mightycampers.co.nz
- www.britz.co.nz
- www.keacampers.com – Not for backpackers, #expensivebutnice!
- www.maui-rentals.com - Not for backpackers, #expensivebutnice!
Itinerary
This is of course, the best bit, planning the trip and what you want to see! It’s mostly a consideration of how long you have and how many spots you want to visit. But there are also some higher level things to consider
Travel in the right direction
So many times we were told “if you want to do the reverse of your trip, we’ll scrap the one way fee”. We were going from North Island (Auckland) to South Island (Christchurch), which is apparently the most popular route. Due to the fact this is the most popular route (Auckland to Christchurch) most camper vans end up on the South Island with no way of getting back up for new customers in the North and so camper companies have to decline customers because they don’t have any vans in the North. So by you planning your trip South to North, they’ll give you a deal as it means the van ends up in the North ready for new customers! Because of this they’ll usually scrap the dreaded ‘one way fee’. Win!
Get the apps
There’s a “Essential NZ tour” app, it basically gives you a guided tour of NZ depending on where you are heading. To be honest, we forgot to download it, but it looks good! http://www.newzealand.com/int/utilities/essential-new-zealand-app/
Our itinerary
We spent a total of 25 days on the road in NZ (with a few days in Auckland and Christchurch at either end), and it was great, so much greenery and wildlife. This topped with some great walks (Tongariro Alpine Crossing). We’ve got an entire list of the campsites we stayed (including some short reviews), and also the spots we hit along the way. These are all shown on the map below (it’s best used if you click the “View larger map” link below the map box). The alphabetic points are in order of the campsites we stayed, the other points are places of interest (stars being places not to miss, question marks being places we wanted to go but didn’t have time/they cost more than we wanted to pay, and the rest being interesting places to visit). Click the point for more info!
If we’ve missed anything or you have any questions, please leave a comment!


